Minimal Self Hosted Home Lab with NextCloud and PiHole
I’ve always been a huge fan of self hosting for variety of reasons. In this post I will cover my personal setup; focusing mostly on the software side of things. I won’t cover much hardware since it’s a topic of its own.
While you can grab cheap servers from ServerMonkey, you could also host your lab on a old computer or laptop.
Why self host?
Self hosting doesn’t necessarily mean self hosting the hardware. You may very well run this setup out of DigitalOcean/Vultr or AWS/Azure. Some of the benefits of self hosting include
- Privacy: Self hosting is a great way to avoid all the privacy concerns related to cloud services. All the data is encrypted end to end and there is no company in the mix profiting by selling your data.
- Cost: Keep costs low and predictable if you are using cloud provider; if your provider raises prices you can always move to another. If you are self hosting the hardware , pay a flat cost up front for the setup and minimal for the operation (eg. cost of power, maintenance, domain names etc.)
- Avoiding Lock-in: You don’t have to worry about Google or Microsoft shutting down their services. You are not tied to any service provider.
- Unlimited possibilities using your own cloud: You could roll your own chat service, document editing service, video calling service etc. you’re only limited by your imagination.
Setup
Operating System: Ubuntu Server LTS
Cloud Storage: Next Cloud
DNS Server: Pi-hole
Setup Next Cloud
- Install Next Cloud: I prefer using Snap since I’m using Ubuntu. It’s as simple as executing the following command.
sudo snap install nextcloud - Setup admin account
sudo nextcloud.manual-install <user name> <password> - Setup a custom trusted domain
This step assumes you already have purchased a domain name from a DNS provider.
sudo nextcloud.occ config:system:set trusted_domains 1 --value=nextcloud.mydomain.com
- Setup SSL using Let’s Encrypt
First off open up TCP port 80/443
sudo ufw allow 80,443/tcp
Generate the cert, follow the prompt the answer the questions.
sudo nextcloud.enable-https lets-encrypt
Setup Pi-hole
Installing Pi-hole is simple just run the following command. Head over to their github for alternative ways to install if executing a script off the internet is not your thing.
curl -sSL https://install.pi-hole.net | bash
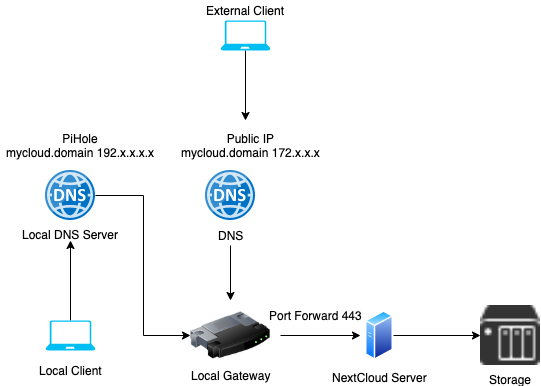
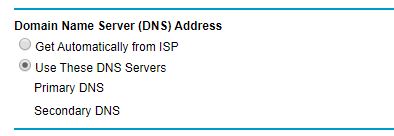
Now that Pi-Hole is setup, you will need to head over to your network router and set your home server as your default DNS server. I’m running a Netgear Router and this is what my configuration looks like.
Speed up access over local network
Devices on the local network do not need to go across the world to talk to your server. There is a simple workaround for this if you’re using Pi-hole. Simply add the mapping for your domain name and local IP of the server.
/etc/hosts

192.168.1.1 nextcloud.mydomain.com
Access your home lab from the inter webs
Access your home lab over the interwebs
This step is completely optional and I’d suggest you take sometime to review your network security, while opening your home network to the internet enable you to access your systems remotely it may also be susceptible to attacks.
This can be achieved in two ways.
1) Port forwarding: You can setup your router to redirect incoming TCP requests on port 443 and 80 to your home server. This is as simple as adding a port to local IP mapping of your server.
2) Reverse proxy: You can setup a nginx reverse proxy on DigitalOcean or cloud provider of your choice and tunnel the traffic using SSH.
Custom domain name
Buy a domain name and point it to your public IP address; assuming your ISP doesn’t change your IP often. Once setup you should be able to access your network using this domain.
Conclusion
With NextCloud and PiHole setup your home lab provides two major features out of the box. First being ad blocking across your home network. This includes in app advertisements. The second being backup and syncing of files and photos across devices. NextCloud comes with mobile apps that make it super easy to backup photos to your home network. You can also visit the NextCloud app store and roll your own chat server or video conferencing!